Thứ Năm, 26 tháng 4, 2018

Sử dụng RelativeLayout trong Android

RelativeLayout là layout mà các View con được xác định vị trí bởi các mối liên hệ với View cha hoặc với View con như View con nằm dưới một View con khác, View con căn thẳng lề phải với View cha ...

RelativeLayout

RelativeLayout là layout mà nó hiện thị các view con nó chứa ở các vị trí trong mối liên hệ của chúng với nhau (như View con này nằm dưới một View con khác, View con này nằm bên trái một View con khác ...), kể cả mối liên hệ của chúng với chính phần tử cha RelativeLayout (như căn thẳng theo cạnh đấy của phần tử cha, nằm giữa phần tử cha, nằm bên trái phần tử cha ...).
RelativeLayout là một layout hết sức mạnh mẽ về độ tiện lợi và hiệu quả, nếu giao diện không ở mức quá phức tạp việc chọn RelativeLayout mạng lại hiệu suất còn tốt hơn ConstraintLayout. RelativeLayout dùng khi đơn giản, ConstraintLayout khi giao diện phức tạp.

Định vị và mối liên hệ các View con trong RelativeLayout

Định vị mặc định

Khi các View con đưa vào RelativeLayout nếu chưa có thiết lập mối liên hệ qua lại nào với phần tử cha hay với phần tử View con khác thì nó sẽ được định vị ở góc trên - trái của RelativeLayout. Như trường hợp dưới đây cả 3 View con không có thiết lập mối liên hệ nào, nên nó đều định vị ở góc trên / trái và vẽ chồng nên nhau, View con nào xếp sẽ ở lớp trên của màn hình.
<?xml version="1.0" encoding="utf-8"?>
<RelativeLayout
    xmlns:android="http://schemas.android.com/apk/res/android"
    android:layout_width="match_parent"
    android:layout_height="match_parent"
    android:layout_margin="8dp"
    android:background="#e2e3eb">

    <TextView
        android:id="@+id/view1"
        android:text="view1"
        android:gravity="center"
        android:layout_width="200dp"
        android:layout_height="50dp"
        android:background="#e8d33636" />

    <TextView
        android:id="@+id/view2"
        android:text="view2"
        android:gravity="center"
        android:layout_width="50dp"
        android:layout_height="200dp"
        android:background="#e71faf15" />
    <TextView
        android:id="@+id/view3"
        android:text="view3"
        android:gravity="center"
        android:layout_width="100dp"
        android:layout_height="100dp"
        android:background="#d4a00f8f" />
</RelativeLayout>

android:gravity và android:ignoreGravity của RelativeLayout

Các View con khi đã định vị xong trong RelativeLayout, giả sử coi như tất cả các View con nằm vừa trong một đường biên chữ nhật, thì cả khối các View con này có thể dịch chuyển tới những vị trí nhất định trong RelativeLayout bằng thuộc tính: android:gravity, nó nhận các giá trị (có thể tổ hợp lại với ký hiệu | giống với LinearLayout)
Giá trịÝ nghĩa
centerCăn ở giữa
topỞ phần trên
bottomPhần dưới
center_horizontalỞ giữa theo chiều ngang
center_verticalỞ giữa theo chiều đứng
leftTheo cạnh trái
rightTheo cạnh phải
bottomCạnh dưới
Hình dưới là ví dụ, thiết lập android:gravity="center|right"
<?xml version="1.0" encoding="utf-8"?>
<RelativeLayout
    xmlns:android="http://schemas.android.com/apk/res/android"
    android:layout_width="match_parent"
    android:layout_height="match_parent"
    android:layout_margin="8dp"
    android:gravity="center|right"
    android:background="#e2e3eb">

    <!-- Các View con --!>

</RelativeLayout>
RelativeLayout có hỗ trợ chỉ ra một View con tách khỏi khối biên chữ nhật chứa các View con để phần tử đó không bị ảnh hưởng bởi gravity bằn thuộc tính android:ignoreGravity="id-view-con"
Ví dụ sau đã tách phần tử TextView có id: textview khỏi ảnh hưởng của gravity của RelativeLayout
<?xml version="1.0" encoding="utf-8"?>
<RelativeLayout
    xmlns:android="http://schemas.android.com/apk/res/android"
    android:layout_width="match_parent"
    android:layout_height="match_parent"
    android:layout_margin="8dp"

    android:gravity="center|right"
    android:ignoreGravity="@id/textview"


    android:background="#e2e3eb">
    <TextView
        android:id="@+id/textview"
        android:text="Example RelativeLayout"
        android:layout_width="wrap_content"
        android:layout_height="wrap_content" />
    <TextView
        android:id="@+id/view1"
        android:text="view1"
        android:gravity="center"
        android:layout_width="200dp"
        android:layout_height="50dp"
        android:background="#e8d33636" />

    <TextView
        android:id="@+id/view2"
        android:text="view2"
        android:gravity="center"
        android:layout_width="50dp"
        android:layout_height="200dp"
        android:background="#e71faf15" />
    <TextView
        android:id="@+id/view3"
        android:text="view3"
        android:gravity="center"
        android:layout_width="100dp"
        android:layout_height="100dp"
        android:background="#d4a00f8f" />
</RelativeLayout>

Định vị View con bằng liên hệ với View cha RelativeLayout

Vị trí của View con trong RelativeLayout có thể thiết lập bằng cách chỉ ra mối liên hệ vị trí với view cha như căn thẳng cạnh trái View cha với View con, căn thẳng cạnh phải View cha với View con ... Các thuộc tính thực hiện chức năng này như sau
Thuộc tínhÝ nghĩa
android:layout_alignParentBottomtrue căn thẳng cạnh dưới view con với cạnh dưới View cha
android:layout_alignParentLefttrue căn thẳng cạnh trái view con với cạnh trái View cha
android:layout_alignParentRighttrue căn thẳng cạnh phải view con với cạnh phải View cha
android:layout_alignParentToptrue căn thẳng cạnh trên view con với cạnh trên View cha
android:layout_centerInParenttrue căn view con vào giữa View cha
android:layout_centerHorizontaltrue căn view con vào giữa View cha theo chiều ngang
android:layout_centerVerticaltrue căn view con vào giữa View cha theo chiều đứng
Ví dụ hình sau View có nền màu tím được định vị như vậy là do có hai thuộc tính android:layout_centerInParent="true" (làm cho View con nằm giữa) android:layout_alignParentRight="true" (làm cho View con căn thẳng cạnh phải với cạnh phải của View cha)
<TextView
        android:id="@+id/view3"

        android:layout_centerInParent="true"
        android:layout_alignParentRight="true"

        android:text="view3"
        android:gravity="center"
        android:layout_width="100dp"
        android:layout_height="100dp"
        android:background="#d4a00f8f" />

Định vị View con bằng liên hệ giữa chúng với nhau

View con trong RelativeLayout ngoài mối liên hệ với View cha như trên, chúng có có thể thiết lập liên hệ với nhau ví dụ như View con này nằm phía trên một View con khác, nằm phía dưới một view con khác ...
Thuộc tínhÝ nghĩa
android:layout_belowNằm phía dưới View có ID được chỉ ra
android:layout_aboveNằm phía trên View có ID được chỉ ra
android:layout_toLeftOfNằm phía trái View có ID được chỉ ra
android:layout_toRightOfNằm phía phải View có ID được chỉ ra
android:layout_alignBottomCăn thẳng cạnh dưới với cạnh dưới của View có ID được chỉ ra
android:layout_alignLeftCăn thẳng cạnh trái với cạnh trái của View có ID được chỉ ra
android:layout_alignRightCăn thẳng cạnh phải với cạnh phải của View có ID được chỉ ra
android:layout_alignTopCăn thẳng cạnh trên với cạnh trên của View có ID được chỉ ra

Các android:layout_margin ... của View con

Về phía các cạnh của View con (left, top, right, bottom) nếu có mối liên hệ với View cha hoặc View con thì theo phía đó có thể thiết lập thêm thuộc tính về margin như: android:layout_marginLeft, android:layout_marginTop, android:layout_marginRight, android:layout_marginBottom để thiết lập khoảng cách của mối liên hệ đó.
Ví dụ sau sử dụng các liên hệ của View con và margin để định vị các View con
<?xml version="1.0" encoding="utf-8"?>
<RelativeLayout
    xmlns:android="http://schemas.android.com/apk/res/android"
    android:layout_width="match_parent"
    android:layout_height="match_parent"
    android:layout_margin="8dp"
    android:background="#e2e3eb">

    <TextView
        android:id="@+id/view1"
        android:text="view1"
        android:gravity="center"

    
        android:layout_toLeftOf="@id/view3"
        android:layout_alignBottom="@id/view3"

        android:layout_width="200dp"
        android:layout_height="50dp"
        android:background="#e8d33636" />

    <TextView
        android:id="@+id/view2"
        android:text="view2"
    

        android:layout_alignRight="@id/view1"
        android:layout_above="@id/view1"

        android:gravity="center"
        android:layout_width="50dp"
        android:layout_height="200dp"
        android:background="#e71faf15" />
    <TextView
        android:id="@+id/view3"
    

        android:layout_centerInParent="true"
        android:layout_alignParentRight="true"
        android:layout_marginRight="30dp"

        android:text="view3"
        android:gravity="center"
        android:layout_width="100dp"
        android:layout_height="100dp"
        android:background="#d4a00f8f" />
</RelativeLayout>

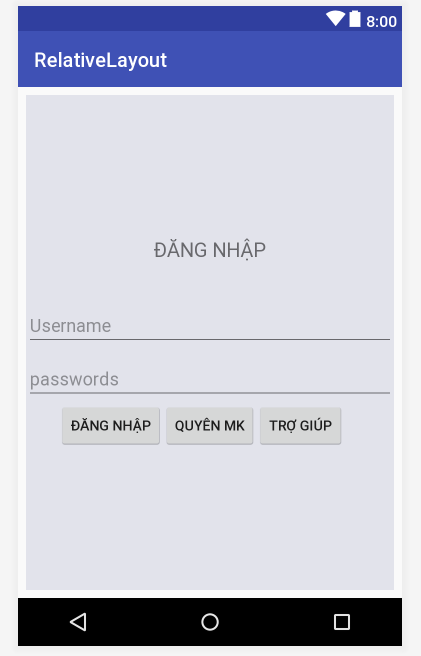
Ví dụ màn hình đăng nhập RelativeLayout

<?xml version="1.0" encoding="utf-8"?>
<RelativeLayout
    xmlns:android="http://schemas.android.com/apk/res/android"
    android:layout_width="match_parent"
    android:layout_height="match_parent"
    android:layout_margin="8dp"
    android:gravity="center"
    android:background="#e2e3eb">


    <TextView
        android:id="@+id/textview"
        android:text="Đăng nhập"

        android:layout_centerHorizontal="true"
        android:textSize="20sp"
        android:textAllCaps="true"

        android:layout_width="wrap_content"
        android:layout_height="wrap_content" />

    <EditText
        android:id="@+id/username"
        android:hint="Username"
        android:layout_below="@id/textview"
        android:layout_marginTop="40dp"
        android:layout_width="match_parent"
        android:layout_height="wrap_content" />
    <EditText
        android:id="@+id/password"
        android:hint="passwords"
        android:inputType="textPassword"
        android:layout_below="@+id/username"
        android:layout_marginTop="8dp"
        android:layout_width="match_parent"
        android:layout_height="wrap_content" />
    <Button
        android:id="@+id/btnLogin"

        android:layout_below="@id/password"
        android:layout_toLeftOf="@id/recoverypassword"

        android:text="Đăng nhập"
        android:layout_width="wrap_content"
        android:layout_height="wrap_content" />
    <Button
        android:id="@+id/recoverypassword"
        android:text="Quyên MK"

        android:layout_centerHorizontal="true"
        android:layout_below="@id/password"

        android:layout_width="wrap_content"
        android:layout_height="wrap_content" />

    <Button
        android:id="@+id/help"
        android:text="Trợ giúp"

        android:layout_below="@id/password"
        android:layout_toRightOf="@id/recoverypassword"

        android:layout_width="wrap_content"
        android:layout_height="wrap_content" />

</RelativeLayout>
Thứ Hai, 9 tháng 4, 2018

Tài nguyên Drawable (6) ảnh StateListDrawable trong Android

Tài nguyên StateListDrawable <selector>

StateListDrawable là loại Drawable mà nó chứa nhiều phần tử <item> bên trong, mỗi phần tử này biểu diễn một Drawable, chúng biểu diện một vài trạng thái nào đó của View khi làm đối tượng đồ họa cụ thể trong từng loại View như làm nền, làm biểu tượng lựa chọn ...
Cú pháp xml tạo ra StateListDrawable như sau:
<?xml version="1.0" encoding="utf-8"?>
<selector
    xmlns:android="http://schemas.android.com/apk/res/android">
    <item>
        <!--Drawable của item-->
    </item>

    <item>
        <!--Drawable của item-->
    </item>
    <!-- ... -->
</selector>

Thuộc tính của <item> trong LayerDrawable

<item> (lớp) của LayerDrawable bên trong nó có chứa phần tử con là bất kỳ loại Drawable nào đã biết như bitmap, vector ... và có thể thiết lập các thuộc tính như sau:
Thuộc tínhÝ nghĩa
android:state_pressed
android:state_checked
android:state_selected
android:state_activated
android:state_focused
android:state_active
android:state_enabled
Thiết lập bằng true thì Drawable của Item biểu diễn trạng thái tương ứng. Nếu thiết lập bằng false biểu diễn không kích hoạt trạng thái có tên tương ứng. Nếu không thiết lập thì không có diễn tả gì cho trạng thái đó. Ví dụ:
  • android:state_pressed="true" Drawable biểu thị trạng thái bị nhấn
  • android:state_pressed="false" Drawable biểu thị trạng thái không bị nhấn
  • Không có thiết lập android:state_pressed thì khi nhấn / không nhấn không sử dụng đến Drawable này
Ví dụ StateListDrawable
Tạo file xml có tên res/drawable/statelistexample.xml
<selector
    xmlns:android="http://schemas.android.com/apk/res/android"
    android:dither="true">
    <item android:state_pressed="true">
      <shape android:shape="oval">
            <gradient android:angle="270"
                      android:endColor="#D1362B"
                       android:startColor="#94231B" />
            <stroke
                android:width="1dp"
                android:color="#96231D" />
            <corners android:radius="4dp" />
            <padding
                android:bottom="10dp"
                android:left="10dp"
                android:right="10dp"
                android:top="10dp" />
     </shape>
    </item>


    <item>
         <shape>
            <gradient
                android:angle="270"
                android:endColor="#94231B"
                android:startColor="#D1362B" />
            <stroke
                android:width="1dp" a
                ndroid:color="#96231D" />
            <corners android:radius="4dp" />
            <padding
                android:bottom="10dp"
                android:left="10dp"
                android:right="10dp"
                android:top="10dp" />
        </shape>

    </item>

</selector>
StateListDrawable này biểu thị hai trạng thái nhấn / không nhấn. Khi không nhấn dùng Drawable có hình chữ nhật, khi nhấn dùng Drawable có hình Oval. Đặt làm nền cho Button có kết quả như sau:

Danh mục Gửi liên hệ

Loading...