Phần này tạo một ứng dụng đơn giản tên là
https://xuanthulab.net/luu-va-phuc-hoi-trang-thai-cua-activity-trong-android.html
Dự án mới tạo ra, phần code Java lưu tại:
Bạn mở file
Như vậy content_main.xml có nội dung:
Bạn có thể nhấn
Giải thích cơ chơ lưu trữ và phục hồi trong Activity
Trước tiên, bạn nên biết các View hiện thị trong Layout như TextView, Button ... đều có phương thức là onSaveInstanceState() và onRestoreInstanceState(Parcelable state), mục đích 2 của phương thước đó là lưu lại trạng thái và phục hồi trạng thái của View nếu cần thiết. Tùy thược vào đối tượng kế thừa overrided lại 2 phương thức này thế nào mà dữ liệu ghi / phục hồi có khác. Ví dụ TextView quá tải để lưu lại nội dung dòng chũ, đến EditText quá tải để lưu lại nội dung dòng chữ và đoạn text đang lựa chọn. Sau này bạn cũng tự xây dựng View và quá tải 2 phương thức này nếu muốn tùy ý muốn lưu lại và phục hồi trạng thái theo cách của bạn.
Điều thứ 2, trong các Activity cũng có hai phương thức là onSaveInstanceState(Bundle outState) và onRestoreInstanceState(Bundle savedInstanceState) được gọi để lưu lại và phục hồi trạng thái của Activity.
Trong vòng đời của Activity thì onPause gọi onSaveInstanceState và onResume gọi onRestoreInstanceState
Bạn có thể quá tải hai phương thức này trong Activity để lưu lại và phục hồi theo tùy chọn của bạn. Nên nhớ là khi onSaveInstanceState(Bundle outState) của Activity gọi thì nó lưu dữ liệu riêng của Activity đồng thời quét qua các View và yêu cầu các View đó chạy
Ví dụ lưu và phục hồi Activity
Như trên đã nói onRestoreInstanceState/onSaveInstanceState gọi tự động ở thời điểm cụ thể của vòng đời Activity. EditText mặc địch nó chỉ lưu và phục hồi nội dung text, trạng thái đang chọn text, nên nếu bạn thay đổi màu nền TextView thì màu nền này sẽ không phục hồi lại vì hàm mặc định không lưu và phục hồi dữ liệu này. Giờ ta sẽ quá tải onRestoreInstanceState/onSaveInstanceState với mục địch có phục hồi thông số này.
Sử dụng Bundle
Trong ví dụ trên, đã sử dụng đến đối tượng lớp Bundle để lưu và phục hồi trạng thái. Mục đích của Bundle để truyền dữ liệu giữa các Activity, nó được sử dụng cơ bản bởi Intent
Tạo một đối tượng Bundle
Ví dụ:
SaveAndRestoreState để tìm hiểu việc lưu lại trạng thái của Activity và phục hồi trạng thái của Activity trong vòng đời hoạt động của nó.https://xuanthulab.net/luu-va-phuc-hoi-trang-thai-cua-activity-trong-android.html
Tạo Project - SaveAndRestoreState
Mở Android Studio chọn tạo Project mới, nhập tên ứng dụng là SaveAndRestoreState, khi đến hộp thoại Add an Activity to Mobile ta chọn mẫu có tên Basic Activity, giữ nguyên gợi ý trong hộp thọa Config Activity (Activity name là MainActivity)Dự án mới tạo ra, phần code Java lưu tại:
MainActivity.java có nội dung (do Android Studio tự phát sinh cơ bản):package net.xuanthulba.saveandrestorestate; import android.os.Bundle; import android.support.design.widget.FloatingActionButton; import android.support.design.widget.Snackbar; import android.support.v7.app.AppCompatActivity; import android.support.v7.widget.Toolbar; import android.view.View; import android.view.Menu; import android.view.MenuItem; public class MainActivity extends AppCompatActivity { @Override protected void onCreate(Bundle savedInstanceState) { super.onCreate(savedInstanceState); setContentView(R.layout.activity_main); Toolbar toolbar = (Toolbar) findViewById(R.id.toolbar); setSupportActionBar(toolbar); FloatingActionButton fab = (FloatingActionButton) findViewById(R.id.fab); fab.setOnClickListener(new View.OnClickListener() { @Override public void onClick(View view) { Snackbar.make(view, "Replace with your own action", Snackbar.LENGTH_LONG) .setAction("Action", null).show(); } }); } @Override public boolean onCreateOptionsMenu(Menu menu) { // Inflate the menu; this adds items to the action bar if it is present. getMenuInflater().inflate(R.menu.menu_main, menu); return true; } @Override public boolean onOptionsItemSelected(MenuItem item) { // Handle action bar item clicks here. The action bar will // automatically handle clicks on the Home/Up button, so long // as you specify a parent activity in AndroidManifest.xml. int id = item.getItemId(); //noinspection SimplifiableIfStatement if (id == R.id.action_settings) { return true; } return super.onOptionsItemSelected(item); } }Bạn thấy hàm onCreate của Activity trên nạp layout bằng phương thức setContentView(R.layout.activity_main);, bạn mở layout này ra (mở file
res\layout\activity_main.xml), nội dung của nó như sau:<?xml version="1.0" encoding="utf-8"?> <android.support.design.widget.CoordinatorLayout xmlns:android="http://schemas.android.com/apk/res/android" xmlns:app="http://schemas.android.com/apk/res-auto" xmlns:tools="http://schemas.android.com/tools" android:layout_width="match_parent" android:layout_height="match_parent" tools:context="net.xuanthulba.saveandrestorestate.MainActivity"> <android.support.design.widget.AppBarLayout android:layout_width="match_parent" android:layout_height="wrap_content" android:theme="@style/AppTheme.AppBarOverlay"> <android.support.v7.widget.Toolbar android:id="@+id/toolbar" android:layout_width="match_parent" android:layout_height="?attr/actionBarSize" android:background="?attr/colorPrimary" app:popupTheme="@style/AppTheme.PopupOverlay" /> </android.support.design.widget.AppBarLayout> <include layout="@layout/content_main" /> <android.support.design.widget.FloatingActionButton android:id="@+id/fab" android:layout_width="wrap_content" android:layout_height="wrap_content" android:layout_gravity="bottom|end" android:layout_margin="@dimen/fab_margin" app:srcCompat="@android:drawable/ic_dialog_email" /> </android.support.design.widget.CoordinatorLayout>Đọc qua nội dung trên, bạn thấy nó dùng một View có tên
CoordinatorLayout làm phần tử chính để bố trí các View con khác trong nó,
các View con có đầu tiên là AppBarLayout, Toolbar là phần thanh ngang phía trên đầu, tiếp theo nó chèn một số
phần tử khác từ content_main bằng cú pháp: <include layout="@layout/content_main" />, ở cuối có một phần tử là FloatingActionButton hiện
thị nút bấm hình tròn.Bạn mở file
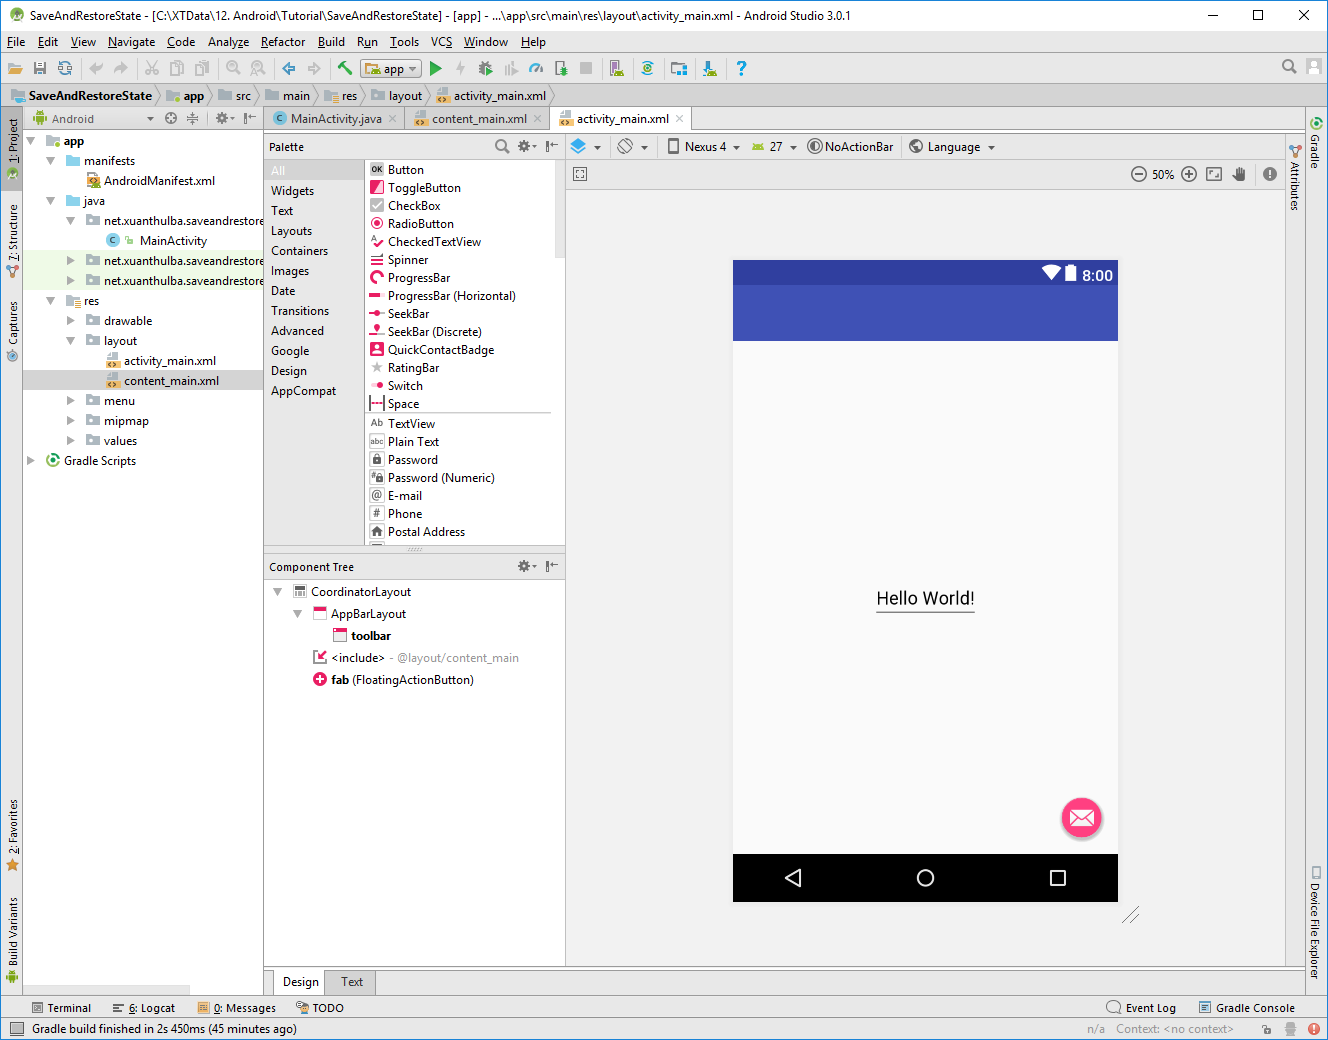
res/layout/content_main.xml ra, bạn thấy nó có phần tử tên TextView là loại View hiện thị chữ, giờ với mục đích
có thể nhập chữ đổi phần tử này thành EditText và gán cho nó một ID là mytext (trong Code Java có thể lấy giá trị này bằng R.id.mytext)Như vậy content_main.xml có nội dung:
<?xml version="1.0" encoding="utf-8"?>
<android.support.constraint.ConstraintLayout
    xmlns:android="http://schemas.android.com/apk/res/android"
    xmlns:app="http://schemas.android.com/apk/res-auto"
    xmlns:tools="http://schemas.android.com/tools"
    android:layout_width="match_parent"
    android:layout_height="match_parent"
    app:layout_behavior="@string/appbar_scrolling_view_behavior"
    tools:context="net.xuanthulba.saveandrestorestate.MainActivity"
    tools:showIn="@layout/activity_main">

    <EditText
        android:id="@+id/mytext"
        android:layout_width="wrap_content"
        android:layout_height="wrap_content"
        android:text="Hello World!"
        app:layout_constraintBottom_toBottomOf="parent"
        app:layout_constraintLeft_toLeftOf="parent"
        app:layout_constraintRight_toRightOf="parent"
        app:layout_constraintTop_toTopOf="parent" />

</android.support.constraint.ConstraintLayout>
Và kết quả quan sát ở chế độ soạn thảo Layout: activity_main
Bạn có thể nhấn
Shift + F10 để thạy chử trên máy ảo, ứng dụng hoạt động tốtLưu lại và phục hồi trạng thái trong Activity
Trong code trên, phần tử EditText có gán ID là mytext đo đó nếu bạn chạy ứng dụng và nhập vào một dòng chữ, nếu lúc đó bạn xoay màn hình thì như đã biết trong vòng đời Activity sẽ gọi lại onCreate, nhưng dòng chữ đó vẫn được giữ nguyên trên màn hình. Có được điều này bởi vì Activity cùng với TextView đã thi hành chức năng ghi lại và phục hồi trạng thái (nếu TextView không gán ID thì chức năng này của TextView không thi hành, bạn có thể thử xóa bỏ ID để kiểm tra)Giải thích cơ chơ lưu trữ và phục hồi trong Activity
Trước tiên, bạn nên biết các View hiện thị trong Layout như TextView, Button ... đều có phương thức là onSaveInstanceState() và onRestoreInstanceState(Parcelable state), mục đích 2 của phương thước đó là lưu lại trạng thái và phục hồi trạng thái của View nếu cần thiết. Tùy thược vào đối tượng kế thừa overrided lại 2 phương thức này thế nào mà dữ liệu ghi / phục hồi có khác. Ví dụ TextView quá tải để lưu lại nội dung dòng chũ, đến EditText quá tải để lưu lại nội dung dòng chữ và đoạn text đang lựa chọn. Sau này bạn cũng tự xây dựng View và quá tải 2 phương thức này nếu muốn tùy ý muốn lưu lại và phục hồi trạng thái theo cách của bạn.
Điều thứ 2, trong các Activity cũng có hai phương thức là onSaveInstanceState(Bundle outState) và onRestoreInstanceState(Bundle savedInstanceState) được gọi để lưu lại và phục hồi trạng thái của Activity.
Trong vòng đời của Activity thì onPause gọi onSaveInstanceState và onResume gọi onRestoreInstanceState
Bạn có thể quá tải hai phương thức này trong Activity để lưu lại và phục hồi theo tùy chọn của bạn. Nên nhớ là khi onSaveInstanceState(Bundle outState) của Activity gọi thì nó lưu dữ liệu riêng của Activity đồng thời quét qua các View và yêu cầu các View đó chạy
onSaveInstanceState() của riêng View đó.
Tương tự khi onRestoreInstanceState(Bundle savedInstanceState) của Activity được gọi, ngoài phục hồi dữ liệu riêng, nó cũng quét qua từng View và yêu cầu chúng chạy onRestoreInstanceState(Parcelable state)
Ví dụ lưu và phục hồi Activity
Như trên đã nói onRestoreInstanceState/onSaveInstanceState gọi tự động ở thời điểm cụ thể của vòng đời Activity. EditText mặc địch nó chỉ lưu và phục hồi nội dung text, trạng thái đang chọn text, nên nếu bạn thay đổi màu nền TextView thì màu nền này sẽ không phục hồi lại vì hàm mặc định không lưu và phục hồi dữ liệu này. Giờ ta sẽ quá tải onRestoreInstanceState/onSaveInstanceState với mục địch có phục hồi thông số này.
@Override
protected void onSaveInstanceState(Bundle outState) {
    super.onSaveInstanceState(outState);

    //Lấy màu của mytext và lưu lại
    ColorDrawable colorDrawable =
            (ColorDrawable)findViewById(R.id.mytext).getBackground();
    int background_mytext = colorDrawable.getColor();
    outState.putInt("background_mytext", background_mytext);
}

@Override
protected void onRestoreInstanceState(Bundle savedInstanceState) {
    super.onRestoreInstanceState(savedInstanceState);

    //Phục hồi màu của mytext
    int background_mytext = savedInstanceState.getInt("background_mytext");
    findViewById(R.id.mytext).setBackgroundColor(background_mytext);


}
Bạn cũng có thể sử mã onCreate thành như sau, để khi bấm vào FAB thì màu EditText thành màu đỏ
@Override
protected void onCreate(Bundle savedInstanceState) {
    super.onCreate(savedInstanceState);
    setContentView(R.layout.activity_main);
    Toolbar toolbar = (Toolbar) findViewById(R.id.toolbar);
    setSupportActionBar(toolbar);

    FloatingActionButton fab = (FloatingActionButton) findViewById(R.id.fab);
    fab.setOnClickListener(new View.OnClickListener() {
        @Override
        public void onClick(View view) {
            Snackbar.make(view, "Replace with your own action", Snackbar.LENGTH_LONG)
                    .setAction("Action", null).show();
            findViewById(R.id.mytext).setBackgroundColor(Color.RED);
        }
    });
}
Giờ bạn chạy ứng dụng, trạng thái của EditText đã lưu và phục hồi không chỉ nội dung chữ mà cả màu nền thiết lập cho nó.
Sử dụng Bundle
Trong ví dụ trên, đã sử dụng đến đối tượng lớp Bundle để lưu và phục hồi trạng thái. Mục đích của Bundle để truyền dữ liệu giữa các Activity, nó được sử dụng cơ bản bởi Intent
Tạo một đối tượng Bundle
Bundle bundle = new Bundle();Dữ liệu được đưa vào Bundle khá giống với
Map, tức là dữ liệu nào đó sẽ được lưu theo cặp key và giá trị.
Dữ liệu được đọc căn cứ vào key lưu trữ đóVí dụ:
bundle.putInt("songuyen", 1000); //key là songuyen

int giatri = bundle.getInt("songuyen"); //Đọc
Các phương thức để lưu dữ liệu như: putInt, putBoolean, putString, putFloat ... tương ứng có các phương thức đọc dữ liệu như getInt, getBoolean, getString, getFloat ...
Không có nhận xét nào :
Đăng nhận xét